A live-edge epoxy table is built in layers of patience. The dramatic part is the pour, but the table succeeds or fails in quieter steps: choosing a dry slab, flattening it, building a leak-proof mold, sealing the edges, controlling bubbles, waiting through the cure, and finishing the surface like real furniture.
Beginners often think the resin is the project. It is only one part of the project. The wood still needs to be stable, the top still needs to be flat, the base still needs to carry the weight, and the finish still needs to survive daily use.
This walkthrough follows the job from slab to finished table. Slow down at the checkpoints. Epoxy gives beautiful results, but it is not forgiving once the main pour is mixed.
A: Loose bark creates an unreliable bond line. Preserve the edge's contour while removing material that can detach.
A: It does not replace drying. Later wood shrinkage can stress the casting and separate the wood-resin boundary.
A: Estimate the river and void volumes, then include the system's seal coats, samples, and a reasonable allowance for irregular pockets.
A: Only use the manufacturer's weight conversion. Resin and hardener densities can make the numerical ratios different.
A: Use it only within its stated casting limits. A thick river generally calls for a system rated for that geometry.
A: Cure samples beside an offcut of the actual slab, using similar depth and the intended room lighting.
A: Follow the resin maker's approved bubble-removal method. Open flames add fire risk, and excessive heat can damage the casting.
A: Follow the product's demolding schedule for your temperature and casting size; demolding and full cure may occur at different times.
A: Follow the finish system's surface-preparation requirements. Highly polished resin may need abrasion for coating adhesion.
A: Use insulating trivets and follow the temperature limits of both the resin and topcoat; a hard surface is not automatically heatproof.
Choose the Table Size First
Before buying a slab or resin, decide what the table needs to be. A dining table, coffee table, desk, console, and side table all have different height, thickness, clearance, and strength requirements. The slab should fit the furniture, not the other way around.
Measure the room and leave space for chairs, walking paths, drawers, legs, and base plates. A slab can look perfect in a shop and still be too wide, too short, too heavy, or awkward once it enters the house.
Write down target length, width, finished thickness, height, base style, resin color, and edge treatment. Those numbers guide every later step, from mold size to resin volume.
Select a Dry, Stable Slab
Use wood that is dry enough for indoor furniture. A wet slab can shrink after the resin cures, leaving gaps, stress, or movement that ruins the clean bond line. Check moisture with a meter and ask how the slab was dried.
Inspect both faces, both ends, and the live edge. Look for twist, cup, cracks, punky areas, loose bark, insect damage, and soft spots. Some cracks can become part of the design, but structural weakness should be handled before the pour.
Choose a slab with enough thickness to survive flattening. Rough slabs often lose material when saw marks, cup, and twist are removed. Plan around the finished thickness, not the thickest rough point.
Plan the Resin Areas
Decide whether the epoxy will fill a river, a center gap, knot holes, cracks, edge voids, or a combination of features. The resin should look intentional. Random fills can make the table feel patched instead of designed.
Lay the slabs or boards on the floor and move them until the shape works. Pay attention to river width, live-edge direction, knots, grain flow, and where people will sit. A narrow river can feel refined. A wide river can look bold, but it also adds cost, weight, and cure risk.
Mark the final orientation. Once the mold is built and resin is mixed, it is too late to rethink the composition comfortably.
Remove Loose Bark and Weak Fibers
Most functional tables are better without loose bark. Bark can break away, trap dust, interfere with adhesion, or leave weak edges in the resin. Use a chisel, scraper, wire brush, or detail sander to clean the live edge while preserving its natural shape.
Remove any soft material that can crumble under finish. Resin bonds to firm, clean wood, not to dust, rot, or loose fibers. Small character marks are fine, but unstable material should be cleaned out before sealing.
Vacuum thoroughly after shaping the edges. Dust left inside cracks can float into resin and show forever.
Flatten the Wood Before the Mold
The slab should be flattened before the main pour whenever possible. A router sled, CNC, wide belt sander, or slab-flattening service can bring the pieces into a predictable plane. Starting flat makes the mold easier to seal and reduces later sanding.
Do not chase perfect finish at this stage. The goal is a stable reference surface, not the final polish. Deep sanding happens after the resin cures and the top is removed from the mold.
If the slab is too warped to flatten without losing too much thickness, reconsider the piece. Epoxy will not make a twisted board behave like a flat tabletop.
Build a Rigid, Leak-Proof Mold
The mold must hold liquid resin without bowing, leaking, or bonding permanently to the table. Melamine, HDPE, sealed plywood, or purpose-made mold materials can work when the surface is flat and protected with release tape or release agent.
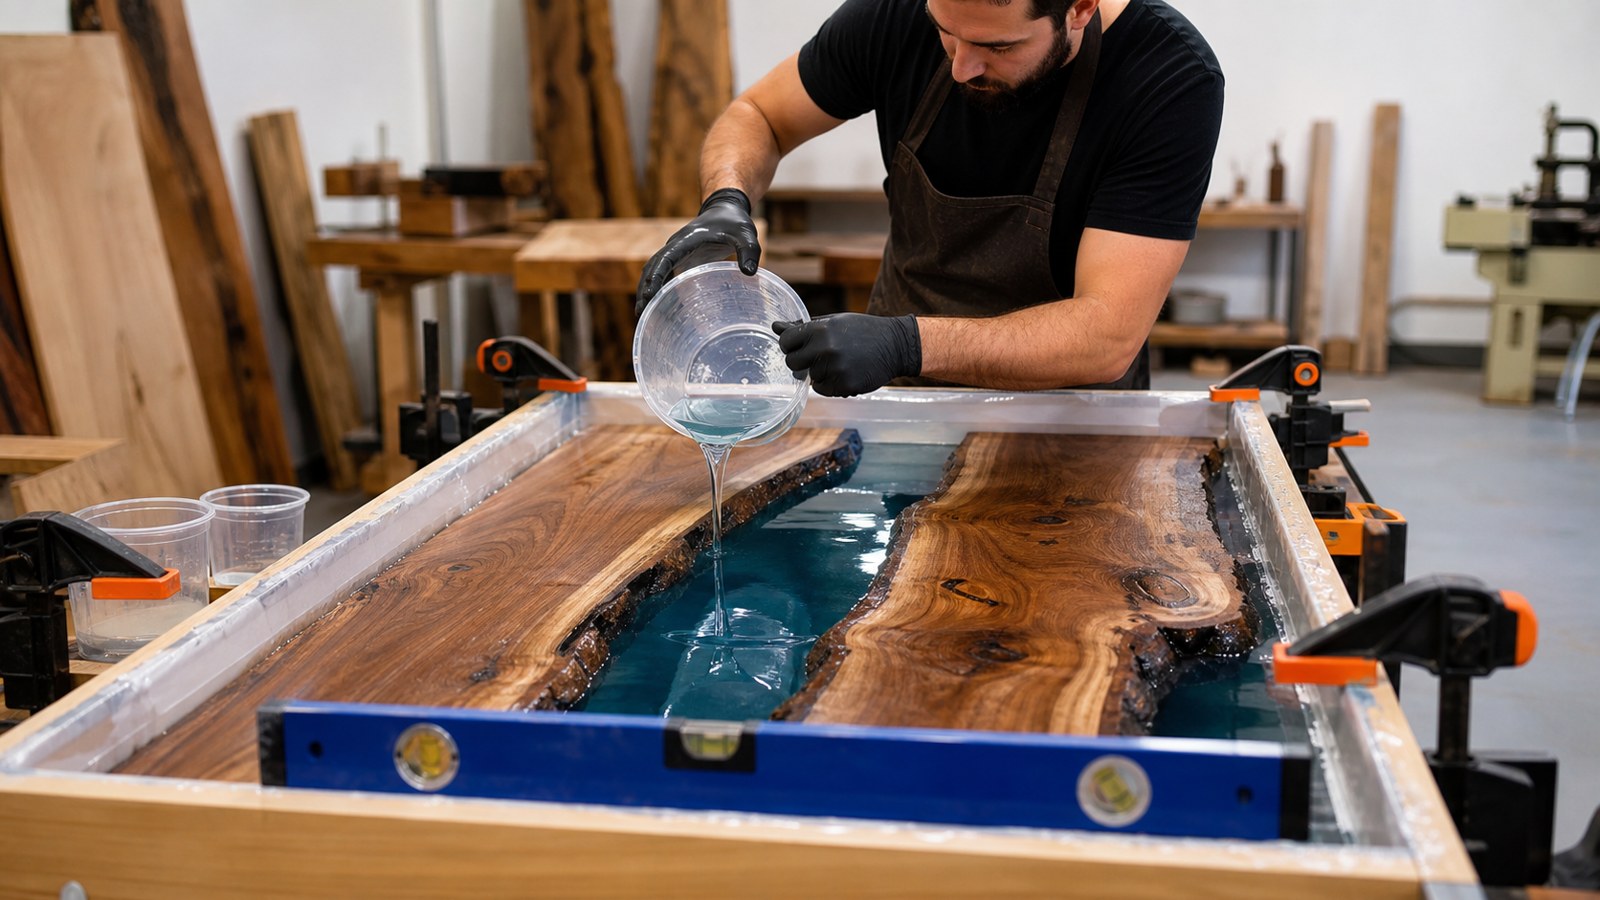
Make the mold larger than the finished table. Leave trimming room on every side. Seal corners and seams carefully with silicone or compatible caulk, then inspect the mold like it is going to leak, because resin will find tiny gaps.
Support the mold on a level surface. A table poured in a tilted mold will cure thicker on one side. Level the work surface before the slabs go in, not after the resin is mixed.
Seal the Wood Before the Main Pour
Live-edge wood often releases bubbles. Seal coats help reduce that problem by locking air into pores, cracks, and edge fibers before the deep pour begins. Use the epoxy system’s recommended approach and allow the seal coat to cure or tack as directed.
Brush resin into edges, cracks, knot holes, and end grain. Watch for areas that keep drinking resin. Those spots may need extra sealing or they may become bubble sources during the main pour.
Sealing also helps prevent tinted resin from staining pale wood. Test first, especially with maple, ash, oak, or any light species where pigment bleed would be obvious.
Clamp and Weight the Slabs
Wood can float in liquid resin. Before the pour, clamp, screw through waste areas, or weight the slabs so they cannot shift. Use methods that will not damage the finished surface or become trapped in the table.
Check the layout after clamping. River width, overhang, end alignment, and live-edge spacing can change as pressure is applied. Adjust before mixing resin.
Protect the top surface from clamp marks. Anything pressed into the wood may need to be sanded out later.
Calculate Resin Volume Carefully
Measure the resin areas and estimate volume before buying materials. Rivers and voids are irregular, so the number will never be perfect, but a reasonable estimate prevents running short in the middle of a pour.
Use the resin manufacturer’s calculator when available. Account for depth, width, length, cracks, knot holes, and waste. Buy extra for seal coats, test pours, leaks, and small top-offs.
Do not mix more than the product allows. Deep-pour epoxy and tabletop epoxy behave differently. Pour depth, pot life, cure heat, and working time must match the product.
Mix Pigment With Restraint
Pigment affects the entire character of the table. A little can create depth and movement. Too much can make the resin look flat, plastic, or muddy. Mix small samples before committing to the main pour.
Test the pigment next to the actual wood under the lighting where the table will be used. Clear resin, black resin, smoky gray, blue, green, bronze, pearl, and metallic effects all change depending on slab color and pour depth.
Keep the design mature. A strong color can be beautiful, but it should support the slab instead of overpowering it.
Mix the Epoxy Thoroughly
Measure resin and hardener exactly according to the product instructions. Guessing ratios can leave soft spots, cloudy resin, heat problems, or uncured areas. Use clean containers, accurate measuring, and a mixing paddle that reaches the corners.
Scrape the sides and bottom of the container while mixing. Many resin failures come from unmixed material hiding along the container walls. Some makers transfer the mixture into a second container and mix again to reduce that risk.
Watch the clock. Pot life matters. Once mixed, the resin should move into the mold within the working time, not sit in a bucket heating up.
Pour in a Controlled Environment
Temperature, humidity, dust, airflow, and level surfaces all affect the pour. Work within the epoxy manufacturer’s temperature range. Cold resin may be thick and bubbly. Hot resin may cure too quickly.
Pour slowly and let resin flow into the river and voids. Use a stick or spreader to guide resin into tight areas. Avoid whipping air into the mixture after it is in the mold.
Cover the table while it cures so dust, insects, and debris do not settle into the surface. The cover should protect the pour without touching it.
Control Bubbles Without Overheating
Bubbles are normal, especially around live edges and open grain. A heat gun, torch, or alcohol mist may be used depending on the resin system, but too much heat can scorch wood, distort resin, damage pigment, or create waves.
Pass heat lightly and keep it moving. Watch edges, knots, and cracks for new bubbles. The goal is to release trapped air, not cook the surface.
Some bubbles continue rising for a while. Return during the working window and check again. After the resin begins to gel, leave it alone.
Let the Cure Finish
Do not rush demolding. Resin can feel firm before it has enough strength for flattening, sanding, or handling. Follow the product’s cure schedule, and remember that temperature affects timing.
Moving the table too early can bend, dent, or stress the resin. Aggressive sanding before full cure can gum up paper and create heat marks. Patience at this stage protects all the work already invested.
If the pour has low spots or small defects, decide whether they need a top-off, fill, or correction after the resin has reached the right stage for repair.
Remove the Table From the Mold
Demold carefully. Remove screws, clamps, sidewalls, and release tape without prying against fragile live edges. If the mold was prepared well, the table should release with controlled pressure instead of force.
Inspect the underside, edges, and corners. Look for leaks, sharp resin fins, trapped tape, voids, or areas that need trimming. Mark the final table outline before cutting.
Use appropriate blades and support the slab during trimming. A heavy resin table can shift suddenly if it is not supported well.
Flatten the Cured Top
After curing, the top usually needs flattening. A router sled, CNC, wide belt sander, or careful professional flattening can level resin and wood together. This step turns a poured slab into a usable tabletop.
Take light passes. Resin and wood can cut differently, and aggressive routing may cause tear-out or heat. Keep the surface supported and clean chips often so they do not scratch the resin.
Flatten both sides if needed. The underside does not need to be polished like the top, but it should sit correctly on the base and hardware.
Sand Through the Grits
Sanding is where many epoxy tables become either polished or disappointing. Start with the grit needed to remove tool marks, then move gradually through the sequence. Skipping grits leaves scratches that become obvious under finish.
Use dust extraction and clean the surface between grits. Resin dust and wood dust can pack into scratches. Good lighting from the side helps reveal swirl marks, dips, and missed areas.
Decide whether the resin will be matte, satin, glossy, or polished. The sanding and finishing sequence should match that goal from the beginning.
Choose a Durable Finish
The finish protects both wood and resin while setting the final sheen. Hardwax oil, polyurethane, conversion varnish, lacquer, and specialty tabletop finishes all have different looks, repairability, and durability.
Test finish on offcuts or the underside. Some finishes change wood color dramatically, some do not bond well to polished resin, and some show scratches more than others. Dining tables and desks need more durability than decorative side tables.
Apply finish in a clean area and follow cure times. A table that feels dry may still need time before heavy use, placemats, hot items, or cleaning products.
Attach the Base Correctly
The base must support the weight, look proportional, and allow wood movement. Metal legs, trestle bases, pedestal bases, and custom frames all work when they are sized for the top. Thin hairpin legs are rarely enough for a heavy dining table.
Use threaded inserts or proper fasteners where appropriate. Elongated holes or slotted brackets may be needed so the wood can move across the grain. Fastening the top too rigidly can create stress.
Check leg placement with chairs and knees. A beautiful base can still be irritating if it blocks seating or makes the table unstable.
Level, Inspect, and Deliver
Set the table on a flat surface and check for wobble, sharp edges, finish defects, and hardware problems. Ease edges where hands will touch. Clean the surface and inspect under natural and artificial light.
Plan delivery before the table is finished. Resin tables can be heavy and awkward. Measure doorways, stairs, hallways, elevators, and the final room. Protect the surface during transport.
Give the table a simple care plan: avoid extreme heat, wipe spills promptly, use coasters or pads where needed, and clean with products compatible with the finish.
Final Epoxy Table Review
A live-edge epoxy table is not difficult because of one step. It is difficult because every step depends on the previous one. Dry wood, a strong mold, sealed edges, accurate mixing, patient curing, careful flattening, and a suitable base all matter.
Beginners should treat the first table as a controlled build, not a race to the pour. The more careful the setup, the less the resin has to rescue later. When the wood, epoxy, finish, and base are planned together, the finished table can feel dramatic and dependable at the same time.