Smooth Paint Begins With Surface Prep
Paint can change a room quickly, but it cannot hide every flaw. In fact, fresh paint often makes dents, ridges, torn paper, nail pops, bad patches, sanding scratches, and roller texture easier to see. Perfectly smooth walls come from preparation before the first coat of paint ever touches the surface. That means cleaning, patching, sanding, skim coating where needed, checking with side light, priming repairs, and removing dust thoroughly. The work is not glamorous, but it is what separates a quick repaint from a clean professional-looking finish. This guide explains how homeowners can get walls smooth before painting without over-sanding, over-patching, or creating new texture problems. Smooth walls are especially important in rooms with strong daylight, long sightlines, or higher-sheen paint. Those conditions act like inspection lights after the project is supposedly finished. Preparing carefully before painting gives the final color a surface that supports it instead of competing with it.
Clean Before You Repair
Walls collect dust, cooking film, fingerprints, bathroom residue, and old sanding powder. Compound and primer bond better to a clean surface, so start by wiping the wall where repairs will happen. Use a mild cleaner where grease or grime is present, then let the surface dry. Skipping this step can make patches lift, primer crawl, or paint reveal dull contaminated spots. If the wall is in a kitchen, bathroom, or entry, cleaning may matter even more because invisible residue can interfere with adhesion.
Cleaning also gives you time to inspect. As you move across the wall, mark dents, nail pops, cracks, torn paper, stains, and rough old roller texture. A light pencil circle is enough. The goal is to create a repair map before tools and compound are out.
Use Light to Find the Real Problems
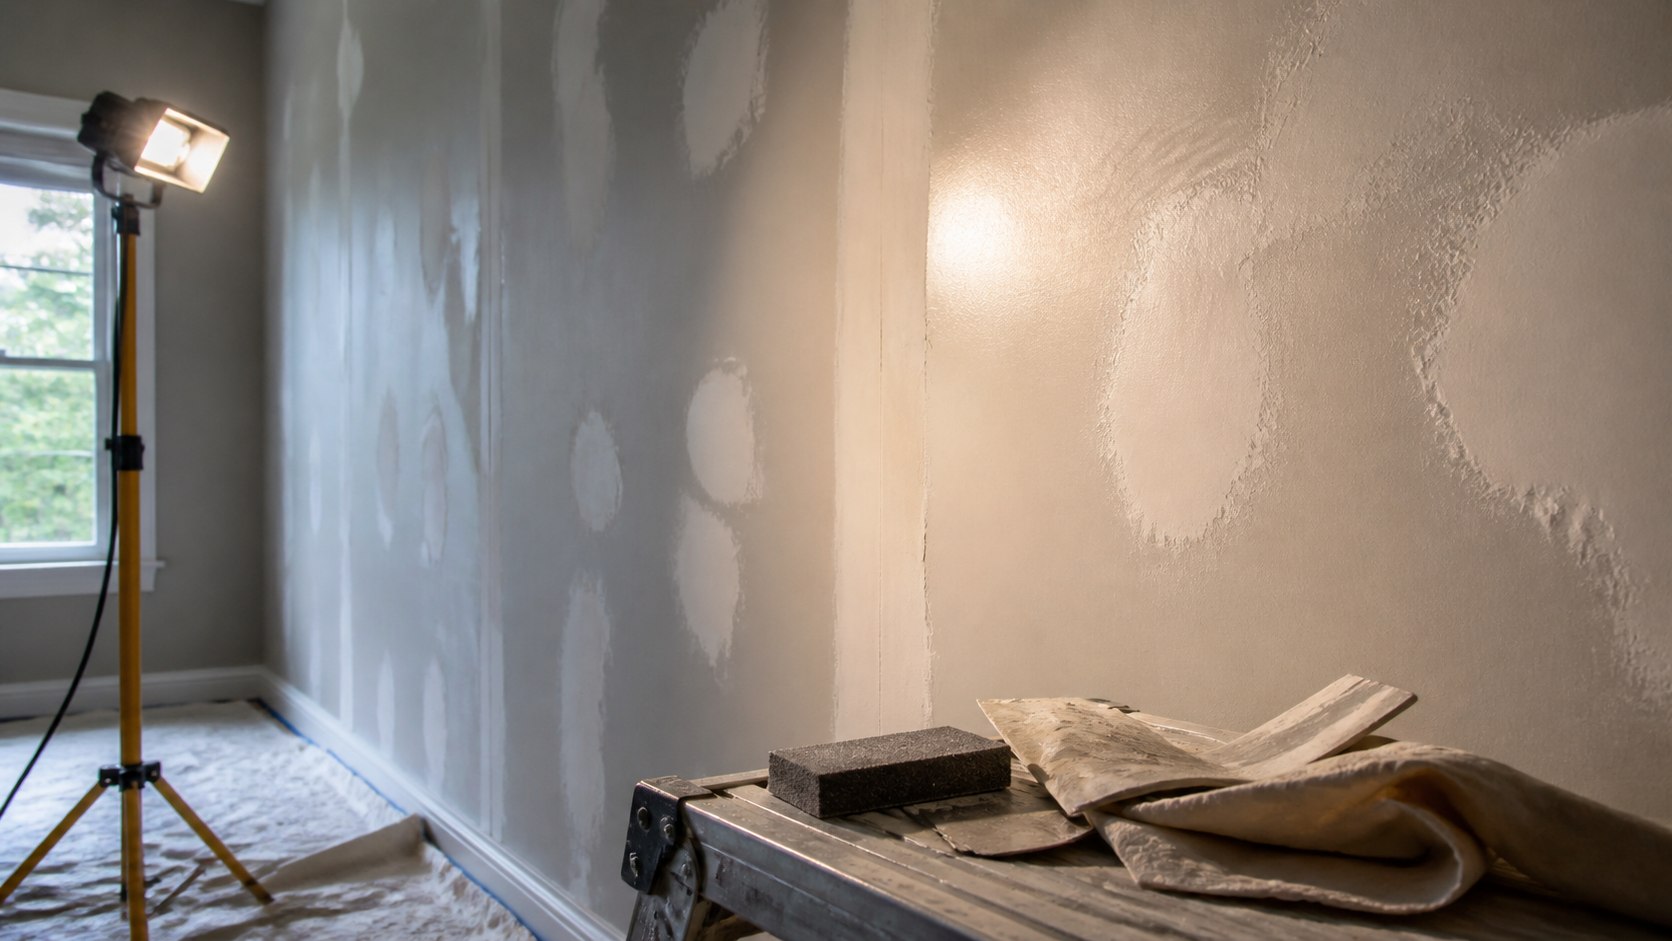
Overhead room light hides flaws because it spreads evenly across the wall. A work light held close to the surface from the side is much more honest. It casts shadows from ridges, dents, patch edges, and sanding scratches. Professional painters use this kind of grazing light because it shows what the finished paint may reveal. Move the light up, down, and across the wall rather than checking from one fixed position. Different angles reveal different flaws.
Look from different directions. A wall may look smooth from the doorway and rough from a window angle. This is especially true with higher-sheen paint, long hallways, and rooms with strong natural light.
Do not try to repair every microscopic mark. Focus on defects that catch light, can be felt by hand, or will sit in obvious view after furniture returns.
Patch With Thin, Wide Coats
The secret to a smooth patch is not piling compound over the damage. It is feathering the repair wider than the flaw so the transition becomes gradual. Small nail holes may need only a tiny fill, but dents, gouges, and old patch edges often need compound spread several inches beyond the damaged area. For broad shallow dents, use a wider knife than feels necessary. The wider blade spreads compound beyond the damaged area and creates a transition the eye is less likely to catch after paint. Narrow patches on open walls often look like small islands because their edges are too abrupt.
Handle Torn Paper Carefully
Torn drywall paper needs special treatment. If wet compound touches fuzzy paper directly, the paper can bubble and create a larger repair. Trim loose edges with a sharp blade, seal the exposed paper with the appropriate primer or sealer, and let it dry before applying compound. This extra step prevents the repair from growing while you work.
Nail pops should also be fixed at the cause. Pressing compound over a raised fastener rarely lasts. Drive the loose fastener properly or add a nearby screw where appropriate, then patch the depression in thin coats.
Sand Without Damaging the Wall
Sanding should flatten and blend, not carve. Use a sanding sponge for small areas and a pole sander for broad surfaces, applying light pressure. Concentrate on the feathered edges of patches. If you sand hard in the center, you can create a hollow that still shows under paint.
Change clogged sandpaper before it scratches. Vacuum or wipe dust away before judging the repair because dust can make a patch look smoother than it is. Then bring the side light back and inspect again.
If the patch still has a ridge, another thin coat is usually better than aggressive sanding. Compound is easier to add carefully than drywall paper is to repair after being scuffed through.
Skim Coat When the Whole Wall Needs Help
Some walls have too many small flaws for spot patching to look even. Wallpaper removal, old texture, repeated repairs, and bad roller stipple can leave a surface that needs a thin skim coat. Skim coating spreads joint compound over a broader area so the surface reads as one plane again. Skim coating also requires realistic expectations. The first pass may look worse before it looks better because it highlights ridges and tool marks. Let each coat dry, scrape ridges before sanding, and keep the next pass thin enough that you are refining the wall rather than burying it.
Prime Repairs Before Painting
Fresh joint compound is porous. If paint goes directly over it, the patched area can absorb differently and show as a dull or shiny spot called flashing. Spot-prime small repairs or prime the full wall when repairs are widespread. Stains, glossy old paint, torn paper, and major color changes may require specialty primer.
Primer is also a final inspection layer. Once it dries, side light may reveal a ridge or pinhole that was hard to see in bare compound. Fixing that flaw before finish paint is much easier than noticing it after the room is done. A small touch-up at this stage is much easier than repainting a finished wall that flashes around a repair.
Remove Dust Like It Matters
Drywall dust is fine enough to cling to trim, outlets, floors, and the wall itself. Vacuum with a brush attachment, wipe surfaces as needed, and clean the room before opening finish paint. Dust left on the wall can create gritty texture and weaken adhesion.
Smooth Walls Are Built in Passes
Perfectly smooth walls rarely happen in one pass. The reliable sequence is inspect, patch, dry, sand, inspect again, prime, and check one more time. Each pass removes a different type of flaw. Trying to skip straight from damage to paint usually leaves evidence behind. If you are tired, stop before finish paint. Wall prep requires judgment, and fatigue makes it easy to miss the raised edge that daylight will reveal tomorrow.
The good news is that wall prep is forgiving when you slow down. Thin coats can be added, ridges can be sanded, and primer can reveal what still needs attention. The only real mistake is rushing paint onto a surface you already know is not ready.
When the wall feels even under your hand, looks clean in side light, and has sealed repairs, paint can do what it is supposed to do: add color and finish instead of fighting the surface underneath.
What Smooth Walls Look Like Under Real Paint
A wall does not need to be mathematically perfect to look beautiful after painting. It needs to be consistent enough that light does not catch obvious ridges, dents, rough patch edges, or texture changes. This distinction helps homeowners spend effort where it matters. A tiny flaw hidden behind a sofa is less urgent than a raised patch in a hallway washed by afternoon sun.
Paint sheen changes the standard. Flat paint is more forgiving because it reflects less light, while satin, semi-gloss, and gloss expose surface problems quickly. Kitchens, baths, trim-adjacent walls, and children’s rooms often use more washable finishes, so prep matters more in those spaces. If the chosen sheen is higher, inspect the wall with stronger side light before painting.
Color also affects what the eye sees. Deep colors and very clean whites can reveal uneven texture, especially on long uninterrupted walls. Primer helps create an even base, but it cannot flatten a ridge or fill a dent. If a dramatic color is planned, surface prep should be more careful, not less.
Do not forget edges. Inside corners, outside corners, baseboard lines, window returns, and areas around switches often collect old paint ridges and rough caulk. These small borders frame the wall. If they look ragged, the whole paint job can feel less clean even when the broad center looks smooth.
There is also a point where repair becomes replacement or professional skim coating. If a wall has widespread failing texture, extensive torn paper, water damage, loose tape, or repeated cracks, spot repairs may create a patchwork surface. A full skim coat or drywall repair may be more efficient than chasing flaw after flaw.
The best test comes before opening the finish paint. Prime the repairs, let them dry, turn on side light, and inspect from the room’s normal viewing angles. If the wall passes then, the paint has a fair chance to look smooth. If it fails, the extra repair time is not a setback; it is the moment that saves the finished room.
A Practical Prep Schedule for One Room
For a typical room, plan wall smoothing as a multi-day process instead of a frantic hour before painting. On the first pass, clean the walls, mark flaws, repair torn paper, set fasteners, and apply the first coat of compound. Let the repairs dry fully. Drying time is not wasted time; it is what keeps patches from shrinking under fresh paint.
On the second pass, sand lightly, inspect with side light, and apply another thin coat where edges still show. Most visible patches need more than one coat because compound shrinks and because wide feathered edges are what make the repair disappear. Trying to finish with one heavy coat usually creates more sanding and a wider hump.
On the third pass, sand for finish, vacuum dust, wipe if needed, and prime repairs. After primer dries, inspect again. Primer changes the surface enough that small defects may appear differently than they did in raw compound. This is the last easy moment to fix them.
Only then should finish paint begin. Cut lines, roller technique, and paint quality matter, but they are built on the surface underneath. A smooth, sealed, dust-free wall lets paint level more evenly and keeps sheen from flashing across repairs.
This schedule may feel slower than simply opening a can, but it produces a room that looks calmer in daylight. Smooth walls are not the result of one magic product. They come from giving each layer enough attention before the next one covers it. Keep a small amount of primer and finish paint labeled for the room so tiny later repairs can be blended with the same coating system. That small habit keeps touch-ups from becoming another full wall project. Label the can with the date and wall color. Store it safely.